
To master the art of frothing milk for lattes, start with a cold pitcher and milk. Aim for a temperature between 135-150°F for the best sweetness. Position the steam wand just below the surface to create microfoam, incorporating air before warming the milk. Whole milk works best, but alternatives like Lactaid or macadamia can also froth nicely. With practice, your latte art will improve. Discover more techniques to elevate your frothing skills and create cafe-quality drinks.
Key Takeaways
- Start with cold milk and a chilled pitcher to achieve the best frothing results.
- Position the steam wand just below the milk surface to create smooth microfoam.
- Aim for a milk temperature between 135-150°F for optimal sweetness and texture.
- Use whole fat or Lactaid milk for rich, creamy microfoam that enhances your latte.
- Practice pouring techniques from various heights to master latte art and achieve beautiful designs.
Best Practices for Frothing Milk

When frothing milk for your lattes, start with a cold 12 oz pitcher and cold milk to get the best results. This keeps your milk at the sweet spot for frothing. Additionally, using a moisture meter can help ensure you maintain the right temperature for frothing. A healthy breakfast should also include whole foods that can provide essential nutrients for your body. Ensuring proper color accuracy in your latte art can enhance the visual appeal of your drink. Regularly checking and cleaning your air purifier filters can contribute to better indoor air quality while you enjoy your latte.
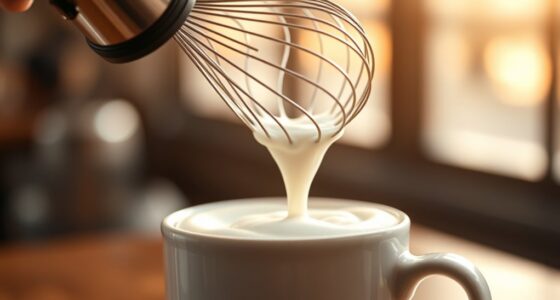
Purge the steam wand before and after using it to prevent any contamination. Position the steam tip just below the milk surface at the start and adjust the depth to create microfoam with occasional rips for ideal air intake.
Purge the steam wand before and after use, and position the tip just below the milk surface to create perfect microfoam.
For a practice latte, focus on incorporating air before the milk warms. If you’re aiming for cappuccino foam, extend the air incorporation phase for denser froth.
Using a stainless steel pitcher helps maintain temperature and gives you control for achieving that perfect texture. Additionally, understanding the mechanics of French press can enhance your overall coffee preparation skills.
Enjoy your frothing!
Ideal Temperature for Frothing

Achieving the ideal temperature for frothing milk is key to enhancing your latte’s flavor. For peak sweetness and texture, you should aim for a temperature between 135-150°F (57-66°C).
Here’s what you need to keep in mind:
- Heating milk above 150°F can cause scalding, resulting in a burnt taste.
- Use a thermometer to monitor the temperature, as steam can create a lag in heat.
- Cut off the steam just before reaching your target to account for rising heat.
- Regular maintenance of your appliance upkeep can ensure that your frother operates efficiently and consistently. Additionally, using milk with probiotics that promote gut health can enhance the overall quality of your latte.
Techniques for Creating Microfoam

Creating microfoam is an art that elevates your lattes to a café-quality experience. To achieve this, position the steam tip just below the milk surface, incorporating air while creating a whirlpool effect for ideal texture. Aim for a milk temperature between 135-150°F (57-66°C) to enhance sweetness, cutting off steam just before reaching the desired temp. You want a velvety microfoam—about 1/4 inch thick after settling, avoiding overly thick foam that floats. Incorporating the right techniques from best lifestyle products can significantly enhance your morning routine. Listen for three sound zones while frothing: bubbling, silent, and roaring; keep the steam tip in the silent zone for the best microfoam. Practice adjusting the steam tip depth and air incorporation duration for varying foam densities, essential for perfect lattes and cappuccinos like the pros do. Additionally, consider diversification strategy in your beverage choices to enhance your overall coffee experience.
Choosing the Right Milk for Frothing

Choosing the right milk for frothing can make all the difference in your latte experience. Here are some top choices to weigh:
Selecting the ideal milk for frothing is crucial for enhancing your latte enjoyment.
- Whole fat dairy milk: It scores 5/5 for frothing, creating rich microfoam with exceptional creaminess. This milk is often favored in Italian espresso culture, where quality is paramount.
- Lactaid milk: A great alternative for the lactose intolerant, it scores 14/15, known for its sweetness and frothing capability. This milk’s frothing ability is comparable to that of many HEPA filter vacuums, ensuring a smooth and enjoyable experience.
- Macadamia milk: Among non-dairy options, it’s a standout with an 11/15 score, offering a sweet nutty aroma and decent frothing properties. Additionally, smart home devices can help monitor your milk frothing temperature for optimal results.
Also, don’t overlook two percent milk, which balances creaminess and frothability well.
Your choice affects the texture and overall taste of your latte, so pick wisely for that perfect cup! Additionally, consider how seasonal arrangements can influence your overall beverage experience, creating a festive atmosphere that complements your latte enjoyment.
Tips for Mastering Latte Art Pouring

While mastering latte art pouring may seem intimidating at first, it’s all about technique and practice.
Start by frothing milk to the ideal temperature of 60-70°C, enhancing sweetness and mouthfeel. Once you’ve frothed the milk, swirl the pitcher and tap it to integrate the microfoam, ensuring a consistent texture. It’s essential to maintain a steady pouring technique to achieve the best results. Additionally, many local roasters emphasize ethical sourcing to ensure that the coffee complements your latte art beautifully. Combining your latte with a delicious dessert like Dirt Cups can elevate the overall experience. For an added treat, consider pairing your latte with a scoop of sugar-free vanilla ice cream for a refreshing balance.
When you begin pouring, hold the pitcher about 15 cm above the espresso to allow the milk to flow rapidly. Gradually lower to around 3 cm for precise designs. Use a steady pouring technique to maintain control, and experiment with angles—higher pours help incorporate milk below the crema, while lower pours define your latte art, creating beautiful shapes in your milk drinks.
Additionally, achieving the right texture in your milk foam is crucial for enhancing taste, as it allows the natural flavors of the espresso to shine through.
With these tips and tricks, you’ll soon be pouring like a pro!
Frequently Asked Questions
How to Properly Froth Milk for Latte Art?
To properly froth milk for latte art, you’ll want to start with cold milk in a cold pitcher.
Position the steam tip just below the surface to incorporate air, creating microfoam. Adjust the depth for a whirlpool effect as you heat the milk to around 135-150°F.
Once frothed, swirl and tap the pitcher to integrate foam, pouring from high to low for a beautiful finish.
What Is the Secret to Frothing Milk?
The secret to frothing milk isn’t just about the technique; it’s about mastering the art of texture.
You’ll want that velvety microfoam, but how do you get there? Start with cold milk and a cold pitcher, positioning the steam tip just beneath the surface.
It’s all about the timing—introduce air before the milk heats up. Keep practicing, and you’ll reveal that perfect froth, transforming your drinks into something extraordinary.
What Common Mistake Should Be Avoided When Frothing Milk?
When frothing milk, you should avoid over-frothing, which creates a thick, bubbly texture instead of that desired smoothness.
Make sure to position the steam tip just below the milk surface initially to incorporate air, then submerge it for heating.
Don’t let the milk exceed 150°F, as scalding can ruin the flavor.
Also, remember to purge the steam wand before and after use to maintain quality and cleanliness.
How to Get the Best Milk for Latte Art?
To get the best milk for latte art, opt for whole fat dairy milk if you can; its rich texture creates perfect microfoam.
If you’re lactose intolerant, try Lactaid milk for a sweet alternative that froths well. For a lighter option, 2% milk works nicely too.
If you prefer non-dairy, macadamia milk’s your best bet.
Conclusion
By mastering the art of frothing milk, you elevate your lattes to new heights. You create creamy microfoam, you achieve the ideal temperature, and you choose the right milk to enhance flavor. With practice, you’ll perfect your pouring technique, transforming every cup into a work of art. So, embrace the process, enjoy the journey, and let your creativity flow—because every latte you make is a chance to express yourself and delight your senses.